Note
Access to this page requires authorization. You can try signing in or changing directories.
Access to this page requires authorization. You can try changing directories.
Applies to: ![]() SQL Server
SQL Server
This article shows you how to perform a SQL Server migration in Azure Arc to SQL Server on Azure VMs in the Azure portal for your SQL Server instance enabled by Azure Arc.
Note
- Migrating to SQL Server on Azure VMs through the Azure portal is currently in preview.
- You can provide feedback about your migration experience directly to the product group.
Overview
SQL Server on Azure VMs is an infrastructure as a service (IaaS) target to run your SQL Server workloads on the Azure cloud platform. After your SQL Server instance is enabled by Azure Arc, you can assess your SQL Server data estate to identify an optimal SQL Server VM configuration. Then you can migrate your SQL Server databases to a SQL Server VM directly from the Azure portal.
When your SQL Server instance is enabled by Azure Arc, you can:
- Evaluate and assess whether your SQL Server instance is ready to migrate to a SQL Server VM.
- Identify potential migration issues, and learn how to mitigate them.
- Optimize for performance and cost with guidance around configuration and sizing.
Discovery of SQL Server instances and generation of readiness reports happen automatically every weekend, but you can start them manually at any time. The process takes only a few minutes to complete. No extra configuration or setup is required.
First, you choose an appropriate SQL Server VM target and prepare your environment. Then, you can migrate your SQL Server databases to a SQL Server VM directly from the Azure portal through a fully managed and automated process.
Database migration is available by default for all SQL Server instances enabled by Azure Arc, starting with SQL Server 2012 (11.x).
The Database Migration pane also has a useful summary of the migration status for your instance, such as the number of total databases, the recommended target, the number of completed migrations, and the number of ongoing migrations:

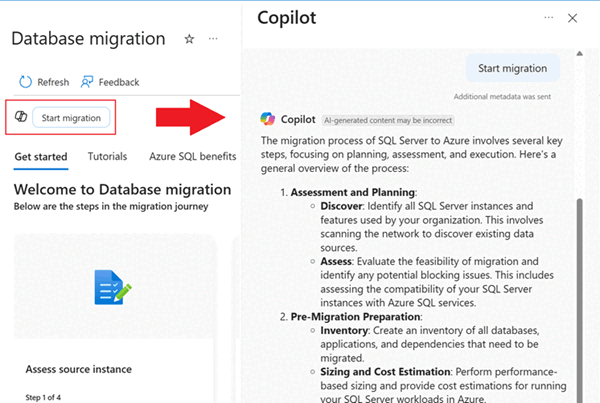
Microsoft Copilot assisted migration
Microsoft Copilot is built into the experience to assist you throughout the migration process. Interactively chatting with Microsoft Copilot searches through the Microsoft knowledgebase to help you along the way as you migrate to Azure.
Microsoft Copilot provides AI-powered assistance to help you make decisions or take actions at certain points with prompts such as:
- How are assessments made?
- Help me compare.
- Start the migration.
- Help me choose the right migration method.
- Monitor the migration.
- Complete the migration.
Select the Copilot icon on the Database migration pane to open the Copilot chat window:
Prerequisites
To use SQL Server migration in Azure Arc, you need the following prerequisites:
- An active Azure subscription. If you don't have one, you can create a free account.
- Your SQL Server instance must be enabled by Azure Arc with the latest version of the Azure extension for SQL Server. To upgrade your extension, see Upgrade the extension.
- Your source environment has been prepared for migration.
Migrate to SQL Server on Azure VMs
The following tiles on the Database Migration pane guide you through the migration of your SQL Server databases to SQL Server on Azure VMs:
- Assess source instance: Assess your SQL Server instance to determine its readiness to migrate to a SQL Server VM.
- Select target: Select a SQL Server VM target for your migration.
- Migrate data: Migrate your SQL Server databases to a SQL Server VM.
- Monitor and cutover: Monitor the migration process and cut over to the SQL Server VM target.
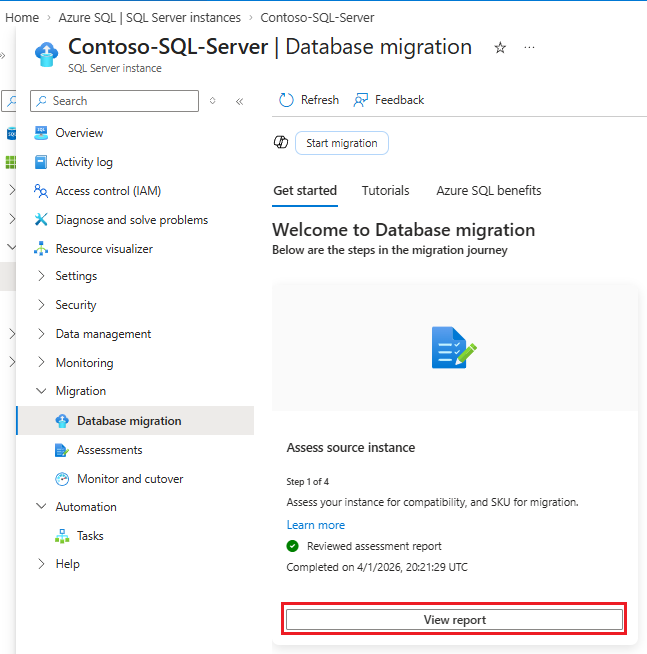
The following screenshot shows the tiles on the Database migration pane for your SQL Server instance in the Azure portal:

Assess source instance
To assess the source instance, follow these steps:
Go to your SQL Server instance in the Azure portal.
Under Migration, select Database migration to open the Database migration pane. Under Assess source instance, select View report to open the Assessments pane.
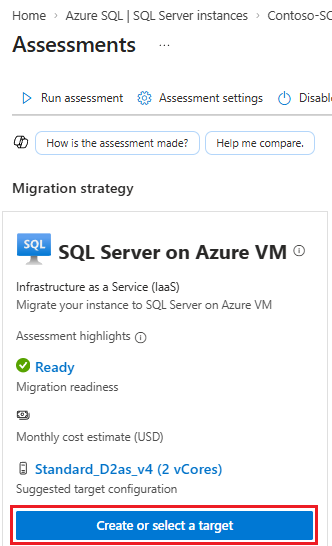
On the Assessments pane:
- Use Run assessment to start a new assessment if one wasn't run recently.
- Use View assessment details in the SQL Server on Azure VM tile to learn more about your assessment results, including the readiness of your SQL Server instance to migrate to a SQL Server VM. You also learn about the recommended configuration for your target instance.
Select target
After you assess your SQL Server instance, select a SQL Server VM target.
On the Assessments pane, select Create or select target. Or, on the Database migration pane, select Select target. Both options open the Create or select target pane where you can identify a migration target.
On the Create or select target pane, under Target exists, select one of the following options:
- Yes, I have already created a target: Select an existing SQL Server VM target.
- No, I want to create a new target: Create a new SQL Server VM target.
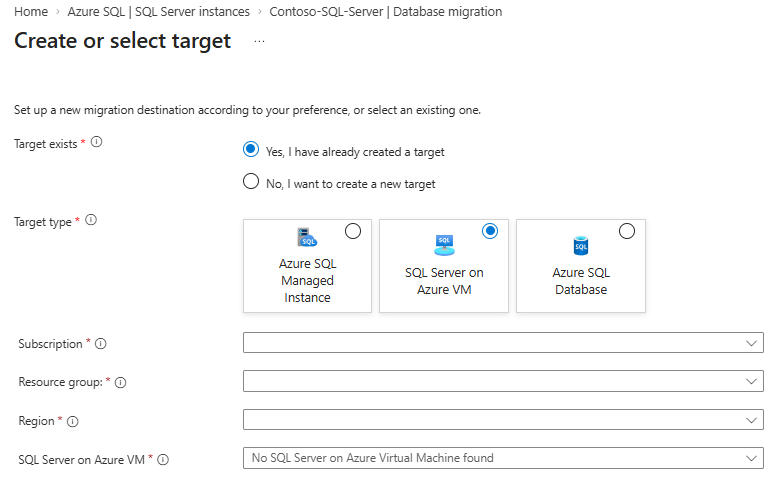
Fill in the required information for the SQL Server VM target. Then use either Select target or Create target to proceed to the next step based on your Target exists selection.
- If you already have a SQL Server VM as a target, choosing Select target takes you to the Database migration pane for your SQL Server VM. The SQL Server VM name is populated as the selected target. Then you can proceed to the Migrate data step.
- If you chose to create a new SQL Server VM, you're guided to the Create SQL Server VM pane on the Database migration pane to create the target SQL Server VM. After you finish, check the progress of the deployment on the Database migration pane for your SQL Server VM. The target name populates in the Target tile. Then you can proceed to the Migrate data step.
Migrate data
After your target is ready, start the migration process.
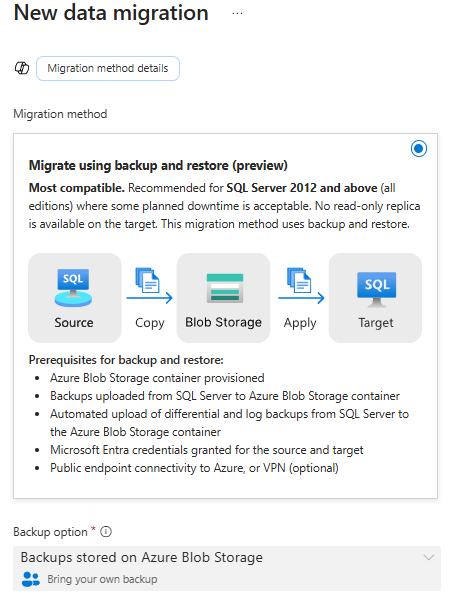
Selections on the New data migration page aren't available, or will error out, after you choose Migrate using backup and restore (preview) unless the Azure Blob Storage account has at least one single full backup, and permissions are correctly set.
SQL Server VM migration relies on backups that you upload to an intermediary Azure Blob Storage account. If you have multiple backups, or want to have a continuous migration, you need to continue uploading backups to the same blob storage account until you're ready to cut over.
Follow these steps to migrate your SQL Server databases to a SQL Server VM by using backup and restore:
On the Database migration pane, select Migrate data.
On the New data migration pane, choose Migrate using backup and restore (preview), and then use Select to proceed to the next page:
On the Select source databases tab, check the boxes next to the databases that you want to migrate, and then use Next to proceed to the next page:
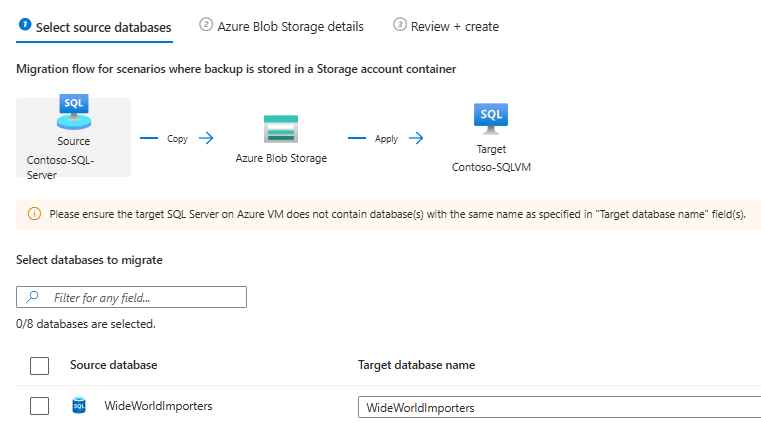
On the Azure Blob Storage details tab, provide the subscription, location, resource group, blob container, and directory details for where you stored your backups.
On the Review + create tab, review the settings, and check for errors and warnings. While it's possible to start the migration when there are warnings, the warnings should be addressed at some point to ensure a successful long-term migration. Select Start data migration to migrate your data to your SQL Server VM target.

Monitor and cutover
After you start your migration, you can monitor the progress. On the Database migration pane, select Monitor migrations.
The Monitor and cutover pane shows useful information about the migration process, such as:
- The databases that successfully migrated and the databases that are still in progress.
- The chosen migration method.
- The target instance and target database.
- The duration of the current migration of each database.
- The time when the migration started.
You can complete or cancel the migration from the Monitor and cutover pane. You can also view logs for information about the migration. Selecting a database takes you to a pane with more details about the source and target.
After the migration finishes, the migration status shows Ready for cutover. To cut over to the SQL Server VM target, select Cutover on the Monitor and cutover pane. You can also use the database details pane.
Select a database and then use Cutover to open the Cutover pane and see different options based on the migration method that you selected.
Limitations
To learn more, see limitations.