Note
Access to this page requires authorization. You can try signing in or changing directories.
Access to this page requires authorization. You can try changing directories.
Batch assessment enables you to analyze a portfolio of Java, .NET, and JavaScript/TypeScript applications in a single run. You get a comprehensive view of the modernization landscape across your applications. This article guides you through the process of assessing multiple repositories efficiently. The process supports both single-language repositories and mono-repos that contain a mix of Java, .NET, and JavaScript/TypeScript projects.
Each application is analyzed along two complementary tracks. Issue scanning finds problems you need to fix. Codebase insights document how the application is built so you can plan around it.
Issue scanning
Issue scanning detects modernization and security problems across three domains. Language coverage differs by domain:
- Upgrade — runtime and framework version analysis. Covers Java and .NET.
- Cloud Readiness — Azure target platform fit and migration problems. Covers Java and .NET.
- Security — CVE scanning across direct and transitive dependencies, plus ISO 5055-guided CWE security problems. Java only at this time; .NET and JavaScript/TypeScript support is on the roadmap.
Codebase insights
Codebase insights document how each application is built. They're produced for Java, .NET, and JavaScript/TypeScript projects. They surface when you select Full analysis in the Analysis Coverage setting.
- Architecture — high-level architecture diagram with layering, module boundaries, runtime topology, and entry points.
- API Contracts — REST, gRPC, message-queue, and webhook surfaces the app exposes or consumes. Sizes integration blast radius before migration.
- Configuration — config files, environment variables, feature flags, connection strings, and secrets. Drives the secrets-and-config migration to Azure Key Vault and Azure App Configuration.
- Business Workflows — end-to-end functional flows reconstructed from code (for example, order → reserve → pay → fulfill). Anchors regression scope and stakeholder communication.
- Dependencies — direct and transitive libraries, SDKs, and drivers with pinned versions. Feeds Azure-service mapping and surfaces EOL or beta pins.
- Data Model — databases, schemas, key entities, and relationships from ORM mappings and DDL. Drives data-tier migration planning.
Reports
Batch assessment is especially valuable for migration planning because it enables you to efficiently assess the readiness and requirements of various applications at once. By using batch assessment, you can evaluate different repositories at the same time and obtain detailed assessment reports for each application. It produces two kinds of reports to support your migration planning:
- Per repository report: Provides detailed insights on the two aspects identified at the individual repository level.
- Aggregated report: Presents an overall perspective of all assessed applications, offering summary insights, recommendations on Azure services, target platforms, upgrade paths, migration strategies, and migration waves. Additionally, the aggregated report includes shortcuts for easy access to each per repository report.
Batch assessment provides the following benefits:
Cross-applications visibility:
- Aggregated reports: Get a comprehensive view across applications.
- Cross-repository analysis: Identify common patterns and dependencies across applications.
- Prioritization insights: Understand which applications need immediate attention.
Scale and efficiency:
- Parallel processing: Use cloud agents to process multiple repositories simultaneously.
- Automated workflows: Integrate with CI/CD pipelines for scheduled assessment.
- Time savings: Reduce total assessment time from weeks to hours.
Prerequisites
- Modernize CLI.
- Access to all repositories you want to assess.
- GitHub authentication is configured (
gh auth login).
Configure repositories
The modernization agent supports multiple ways to specify the repositories you want to assess:
- Current folder: Assess the project in your current working directory.
- Manual input: Enter local directory paths or remote Git URLs directly.
- Repository config file: Use a JSON config file that lists all repositories.
Repository config file
For batch operations across many repositories, create a JSON config file to list all repositories. For example, create it at .github/modernize/repos.json in your working directory, or provide a custom path.
Make sure you have the right permissions for the repositories or fork them.
Simple format (array of repositories):
[
  {
    "name": "PhotoAlbum-Java",
    "url": "https://github.com/Azure-Samples/PhotoAlbum-Java.git"
  },
  {
    "name": "PhotoAlbum",
    "url": "https://github.com/Azure-Samples/PhotoAlbum.git"
  },
  {
    "name": "eShopOnWeb",
    "url": "https://github.com/dotnet-architecture/eShopOnWeb.git"
  }
]
Full format (with branch and local paths):
{
  "repos": [
    {
      "name": "PhotoAlbum-Java",
      "url": "https://github.com/Azure-Samples/PhotoAlbum-Java.git",
      "branch": "main"
    },
    {
      "name": "local-project",
      "path": "/absolute/path/to/project"
    }
  ]
}
Each repo entry supports the following fields:
| Field | Description | Required |
|---|---|---|
name |
A friendly name for the repository (used in reports and dashboards). | Yes |
url |
Git clone URL in HTTPS or SSH format. | One of url or path |
path |
Absolute local directory path. | One of url or path |
branch |
Branch to check out after cloning. | No |
description |
Human-readable description. | No |
Full format with app grouping (optional, for organized reporting):
You can add an apps[] section to group repositories into logical applications. When apps are defined, the aggregated report organizes results by application and supports report distribution to external destinations.
{
  "repos": [
    {
      "name": "PhotoAlbum-Java",
      "url": "https://github.com/Azure-Samples/PhotoAlbum-Java.git",
      "branch": "main"
    },
    {
      "name": "PhotoAlbum",
      "url": "https://github.com/Azure-Samples/PhotoAlbum.git"
    }
  ],
  "apps": [
    {
      "identifier": "photo-app",
      "description": "Photo management application",
      "repos": ["PhotoAlbum-Java"],
      "output": {
        "type": "local",
        "path": "/path/to/reports/photo-app"
      }
    }
  ]
}
Each app entry supports:
| Field | Description | Required |
|---|---|---|
identifier |
Unique display name of the application. | Yes |
description |
Human-readable description. | No |
repos |
List of repo names that belong to this app. | Yes |
output |
Where to distribute this app's assessment report after generation. | No |
The output field supports the following distribution types:
| Type | Description | Required fields |
|---|---|---|
local |
Copy reports to a local directory. | path |
git |
Push reports to a Git repository. The URL format is https://github.com/org/repo.git#branch:path. |
url |
Tip
You can include repositories from different organizations and use different authentication methods as long as you have access.
The modernization agent automatically detects the repos.json file at .github/modernize/repos.json when you select From a config file in interactive mode. You can also provide a custom path.
Run batch assessment
Two execution modes are available:
- Local execution: The modernization agent processes repositories one after another on your local machine. This mode works best for a smaller set of applications or for initial testing. Supports both Git URL and local path repositories.
- Cloud agent delegation: The modernization agent submits tasks to GitHub Copilot cloud agents for parallel processing in the cloud. This mode is faster for multi-repo scenarios.
Important
Cloud agent delegation requires repositories to have GitHub (github.com) repository URLs. Local path repositories and non-GitHub providers (GitLab, Azure DevOps) aren't supported for cloud delegation. Use local execution for those repositories.
Tip
By using Cloud agent delegation, you enable parallel execution across all repositories. This approach significantly reduces the total assessment time for large portfolios.
Interactive mode (assess locally)
Run the modernization agent:
modernizeSelect Assess from the main menu.
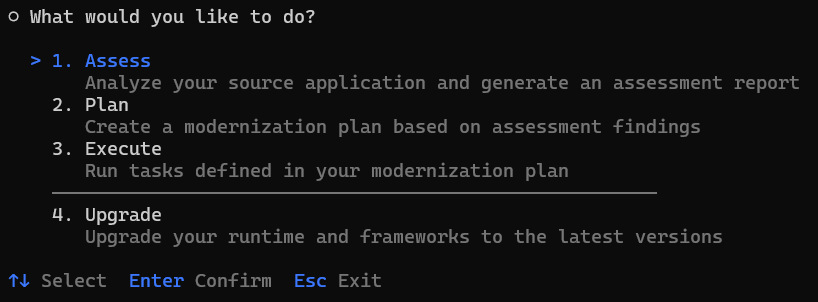
Choose how to specify your target repositories. Select From a config file to use a
repos.jsonfile.
Tip
You can also select Manual input to enter local paths or remote Git URLs directly, or Current folder to assess the project in your current directory.
If the
repos.jsonfile is detected at the default location, the agent automatically fills it in. Otherwise, enter the path to your config file and press Enter.All repositories are selected by default. Deselect any repositories you want to skip, and then press Enter to confirm your selection.
- Use arrow keys to navigate and press Space to toggle individual repositories.

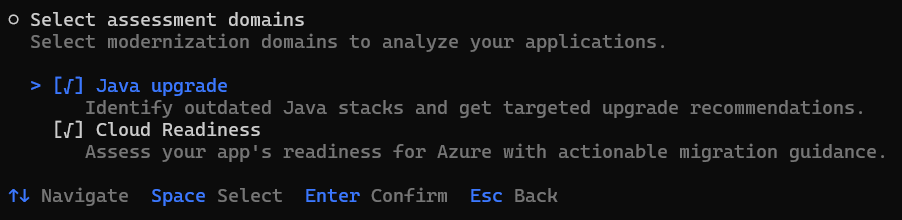
Select the assessment domains to analyze. Upgrade and Cloud Readiness run on Java and .NET projects in the repository. Security is unchecked by default and runs on Java projects only; select it to scan for CVE vulnerabilities and ISO 5055-guided CWE issues.
Review and configure the assessment options. The configuration page shows options grouped by language and domain:
- General / Analysis Coverage:
- Issue only (default): Detects modernization and security issues in your source code. Fastest option.
- Full analysis: Detects issues and additionally generates codebase insights across six aspects of your application — Architecture, API Contracts, Configuration, Business Workflows, Dependencies, and Data Model. Takes longer to run than issue-only analysis.
- Java / UPGRADE: Target Runtime (OpenJDK 11, 17, 21, or 25).
- Java / CLOUD READINESS: Target Compute Services, Target Operating System, and Containerization.
- Java / SECURITY: Minimum CVE severity (
low,medium,high,critical; defaulthigh). Lower severity values include more findings. (Security domain is Java-only today.) - .NET / UPGRADE: Target Framework (.NET 8, 9, or 10).
- .NET / CLOUD READINESS: Target Compute Services.
Use the arrow keys to navigate, press Enter to change a value, or select Continue to proceed with the current settings.
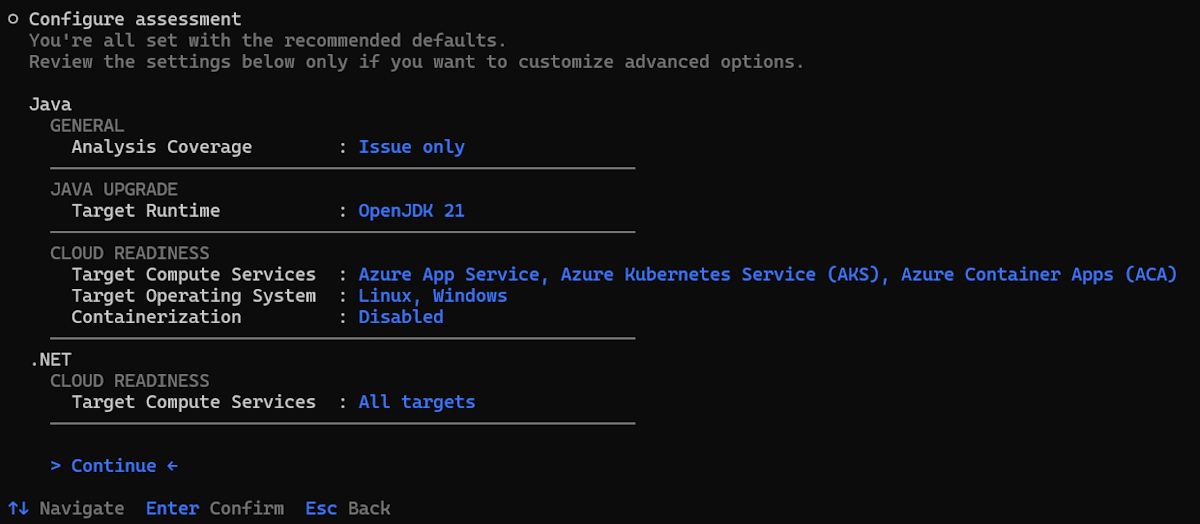
Tip
The recommended defaults work for most scenarios. You only need to change these settings if you have specific requirements, such as targeting a particular JDK version, a specific Azure compute service, or a different CVE severity threshold.
- General / Analysis Coverage:
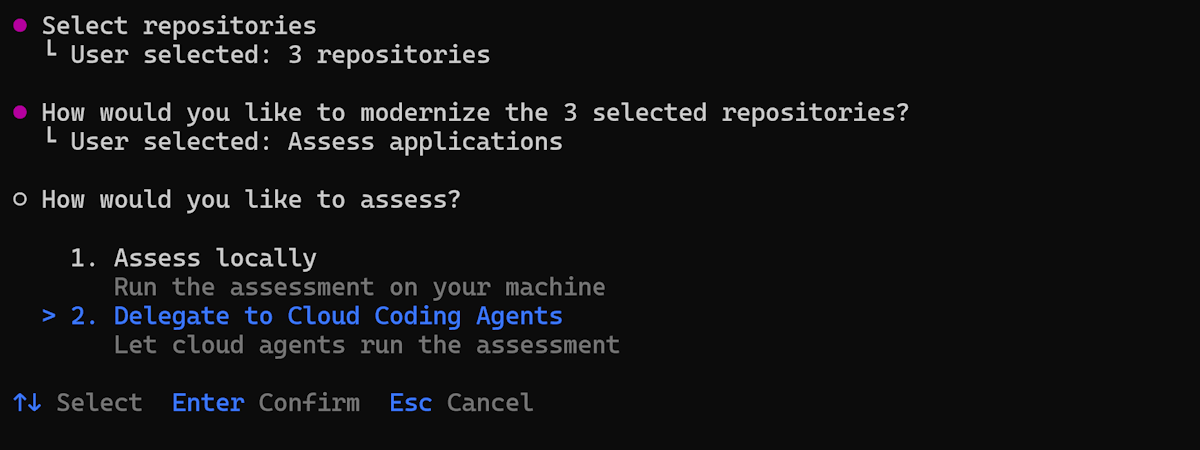
Choose the execution mode. Select Assess locally.

Enter the output path for assessment results or press Enter to accept the default.
The agent automatically:
Clones remote repositories (local path repositories are used directly).
Runs assessment on each repository one by one.
Generates individual assessment reports.

Creates an aggregated report.

When the assessment finishes, the agent automatically opens the aggregated report.


Interactive mode (delegating to cloud agents)
First, configure cloud agents in each application repository. To configure cloud agents, fork the sample repositories.
Configuration for .NET applications
Configure to run on Windows for .NET Framework applications
By default, the Copilot cloud agent runs in an Ubuntu Linux environment. For .NET Framework applications, you need a Windows environment. To enable it, configure .github/workflows/copilot-setup-steps.yaml in the main branch of your application repository as shown in the following example:
# Windows-based Copilot Setup Steps for .NET tasks
# Note: Windows runners have firewall limitations that may affect some network operations
# Use this workflow for .NET projects that require Windows-specific tooling

name: "Copilot Setup Step (Windows)"

on:
  workflow_dispatch:

jobs:
  copilot-setup-steps:
    runs-on: windows-latest
    permissions:
      contents: read
    steps:
      - name: Checkout code
        uses: actions/checkout@v5
Learn more from: Customizing Copilot's development environment with Copilot setup steps
Disable firewall
Disable Copilot cloud agent's integrated firewall in your repository settings as shown in the following image:

MCP Server
Configure GitHub Copilot Modernization MCP Server in the Cloud agent section of your repository settings as shown in the following example:
{
  "mcpServers": {
   "AppModDotNetUpgrade": {
        "type": "local",
        "command": "dotnet",
        "args": [
          "dnx",
          "Microsoft.GitHubCopilot.Modernization.Mcp",
          "--prerelease",
          "--yes",
          "--source",
          "https://api.nuget.org/v3/index.json"
        ],
        "env": {
          "APPMOD_CALLER_TYPE": "modernize-cli"
        },
        "tools": ["*"]
    }
  }
}
Configuration for Java applications
Configure GitHub Copilot Modernization MCP Server in the Cloud agent section of your repository settings as shown in the following example:
{
  "mcpServers": {
    "app-modernization": {
      "type": "local",
      "command": "npx",
      "tools": [
        "*"
      ],
      "args": [
        "-y",
        "@microsoft/github-copilot-app-modernization-mcp-server"
      ]
    }
  }
}

Steps
The interactive flow for cloud delegation is identical to Assess locally through the source, repository, domain, and configuration steps. The only difference is the execution-mode choice and what happens afterward.
Run the modernization agent:
modernizeSelect Assess from the main menu, choose your source (config file, manual input, or current folder), select repositories, pick your assessment domains, and review the configuration. These steps work exactly as described in Interactive mode (assess locally).
Choose the execution mode. Select Delegate to Cloud Agents.
Enter the output path for assessment results or press Enter to accept the default.
The agent automatically delegates assessment tasks for each repository to cloud agents and executes them in the cloud in parallel.
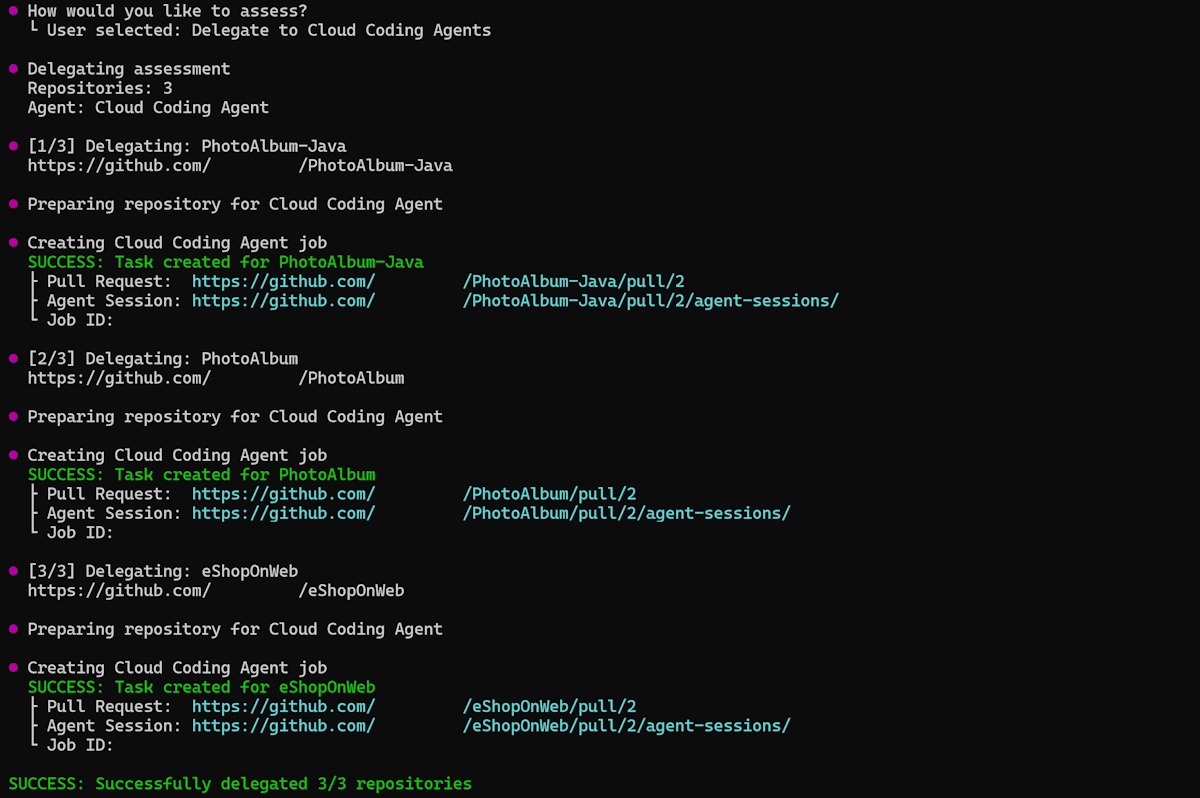
The agent pulls the per-app assessment results back to local and generates the aggregated report locally.
When the assessment finishes, the agent automatically opens the aggregated report.


Non-interactive mode (CLI)
You can also use non-interactive mode by specifying command arguments directly. Use the modernize assess command:
Assess locally using a repository config file:
modernize assess --source .github/modernize/repos.json
Assess multiple repositories by specifying sources directly:
modernize assess --source https://github.com/org/repo1 --source https://github.com/org/repo2
Assess by delegating to cloud agents:
modernize assess --source .github/modernize/repos.json --delegate cloud --wait
For more information, see assess - CLI commands.
Azure Migrate integration
You can drive batch assessment directly from your Azure Migrate project and have the resulting reports flow back to Azure Migrate automatically.
The end-to-end flow:
Download a starter
repos.jsonfrom Azure Migrate. Azure Migrate generates a JSON file scoped to the applications you selected for modernization assessment. The file already contains theapps[]entries and theoutputblock that points back to your Azure Migrate project.Fill in repository URLs. Edit each
repos[]entry in the downloaded file to add the GitHub repository URL for the application. Keep theapps[]andoutputblocks as Azure Migrate generated them - those blocks drive the upload.Run batch assessment. Run the assessment locally or by delegating to cloud agents following preceding steps. Both execution modes honor the Azure Migrate output configuration.
Reports upload automatically. When the assessment completes, the modernization agent uploads each application's report back to your Azure Migrate project. No extra CLI flag is required - the
output.typesetting in therepos.jsonfile drives the upload.
Understanding the aggregated report
The aggregated report provides a comprehensive view across assessed applications as follows:
Dashboard
- Snapshot of portfolio health: total apps, how many need upgrades, and aggregate blocker and issue counts.
- Technology distribution: what frameworks are in use and how many apps share them.
- Effort distribution: whether the overall migration is a small or large undertaking.
Recommendations
- Azure Services: maps current dependencies to recommended Azure equivalents. Shared dependencies across apps are decided once, so you avoid per-app rework.
- Target Platform: guides hosting choice, such as Azure Container Apps versus AKS, and surfaces consolidation opportunities.
- Upgrade Path: identifies which apps need framework upgrades as a prerequisite, separating upgrade work from migration work.
- Cost Estimate: estimates the Azure cost of running each application on its recommended target, so you can factor spend into prioritization.
- Migration Strategies: recommends a migration approach per application — for example, Replatform for lift-and-reshape moves or Rearchitect for deeper refactoring — so each app gets a strategy matched to its readiness.
- Migration Waves: sequences apps by readiness and risk into phases (for example, Wave 1 quick wins, Wave 2 core cloud, Wave 3 long-term bets). This approach enables early wins while harder apps are prepared in parallel.
Application assessment matrix
- Quick overview for each application on aspects of framework, target platform, upgrade recommendation, issue breakdown (Mandatory, Potential, Optional), effort sizing, and more.
- Links to individual app reports for drill-down when needed.
Troubleshooting batch assessment
Common problems
Repository access errors:
- Verify GitHub authentication by using
gh auth status. - Make sure you have access to all repositories listed in
repos.json.
Clone failures:
- Verify repository URLs in
repos.jsonare correct and accessible. - Make sure you have the right access permissions for all repositories.
- Check your network connectivity and VPN settings.
Assessment failures:
- Check if the repository contains valid Java, .NET, or JavaScript/TypeScript projects.
- Verify that build files exist, such as
pom.xml,build.gradle,*.csproj,*.sln,*.slnx, orpackage.json. - Review error messages in the console output. Non-fatal warnings (for example, missing build files in a sub-module) are now surfaced directly to the CLI output - review them before treating the report as final.
Cloud agent delegation problems:
- Cloud agent delegation accepts only
https://github.com/...repository URLs. Local paths and non-GitHub providers (GitLab, Azure DevOps) are rejected upfront with a descriptive error. Use local execution for those repositories. - Make sure you have the right permissions to create GitHub Actions workflows.
- Check GitHub Actions permissions and quota limits for your organization.
- For .NET Framework apps, make sure Windows runner configuration is properly set.
- Check your MCP server configuration.
Next steps
After completing batch assessment, you can:
Continue the modernization workflow:
- Run batch upgrade across repositories - Apply consistent upgrades based on assessment findings.
Learn more:
Provide feedback
Your input is important! If you have any feedback about batch assessment or the Modernization agent, create an issue at the github-copilot-appmod repository or use the GitHub Copilot modernization feedback form.